Run Lambda functions with fixed IP
How to run your AWS Lambda functions with a fixed IP up to 10x cheaper.

An architect by trade, practicing architecture in the Cloud. 7x AWS Certified, AWS Community Builder, Serverless advocate, Vue enthusiast.
A Lambda function runs in its own container and when invoked, the external requests to 3rd-party services will appear as coming from various IP addresses.
This becomes a problem when our Lambda function needs to communicate with IP-restricted access resources. I recently needed in a serverless project a Lambda function to connect to an Azure SQL Database that only accepted connections from whitelisted IP addresses.
There's no way to configure the IP address of a Lambda function.
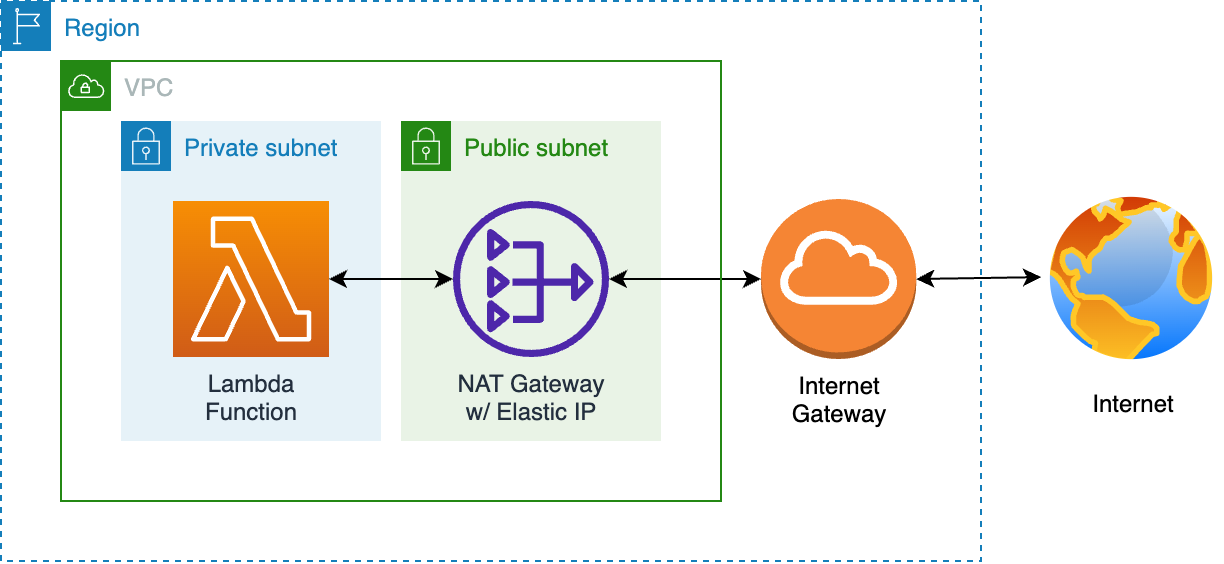
The solution is to run the Lambda inside a VPC and route the outbound connections through a NAT that gets assigned an Elastic IP. This way the external requests done by the Lambda function will have the same IP address on every invocation.
When running inside a VPC, our Lambda function doesn't have access to the internet, even when connected to a public subnet. There's no way around using a NAT.
The standard implementation of the service architecture looks as in the diagram below. NAT is the key piece when we need a fixed IP for our Lambda functions.
What's a NAT?
A Network Address Translation (NAT) is a compute instance that enables traffic between our resources in a private subnet and the Internet.
In AWS we have 2 NAT options: NAT Gateway & NAT Instance.
The NAT Gateway is the official recommendation, but it comes at a premium.
NAT Gateway vs. NAT Instance
NAT Gateway is a highly available and scalable managed service, and it costs $0.045/hr, about ~$33/month before tax.
For personal projects, dev environments, or even in production for low-traffic or non-business critical applications a NAT Gateway is overpriced for its role.
In my case, the Lambda function has to connect just a couple of times a day to the Azure SQL Database and pull some fresh data, it's not a business-critical service, occasional failure can be tolerated. Adding the NAT Gateway into the stack would have 4X'ed the project's monthly AWS bill. Serverless ;)
Instead of a NAT Gateway, I used an EC2 instance that's configured to act as a router between the private subnet where the Lambda is invoked and the outside world, a NAT Instance.
Actually, this is nothing new, for many years the only way to create a NAT in AWS was by creating a NAT Instance.
An EC2 t4g.nano instance costs $0.0042/hr, so the smallest NAT Instance can be 10x cheaper compared to NAT Gateway.
The downside of using a NAT Instance instead of a NAT Gateway is we have to configure and then manage it, we're responsible for replacing the instance if it goes down and for applying software patches.
To solve the availability problem we'll launch the NAT Instance inside an Autoscaling group, there are no additional fees for it, and like this, we make sure to have a healthy NAT Instance running at all times. A self-healing NAT Instance. To patch it we can use AWS Systems Manager.
Worth mentioning that both options fail the serverless litmus test.
Routing Lambda through a NAT Instance
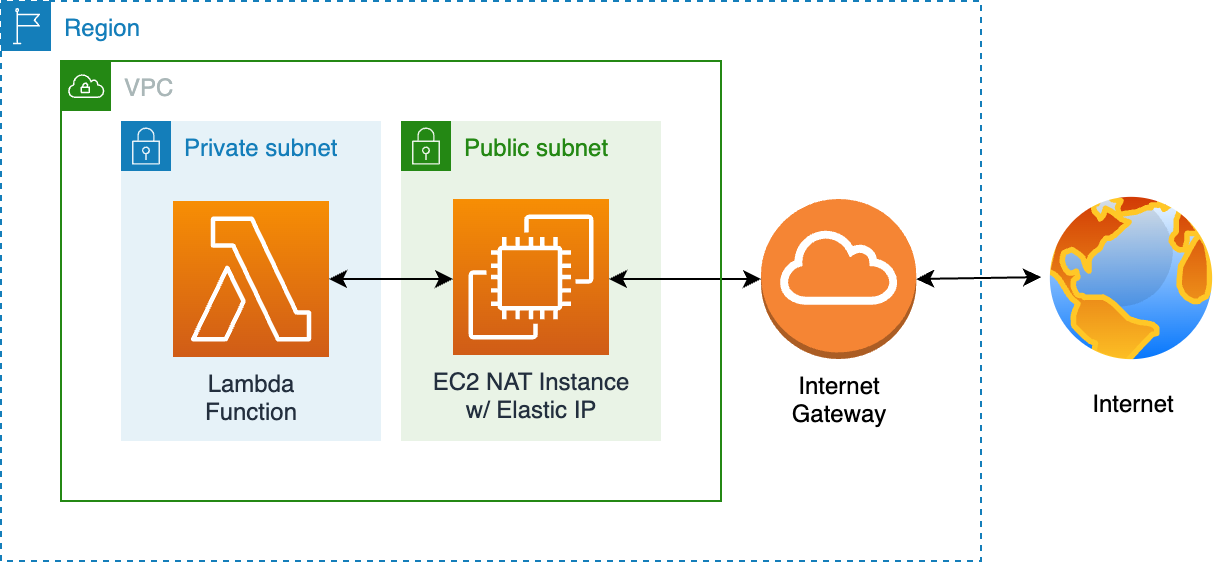
In this article, I'll explain how to run your Lambda functions with a fixed IP using a NAT Instance, which is up to 10x cheaper than a NAT Gateway.
The service architecture diagram remains almost the same, we replace the NAT Gateway with an EC2 instance that will do the NAT job.
Setting up a NAT Instance is a bit more complicated than using a NAT Gateway, but worry not, at the end of the article you'll find a 1-click deployment CloudFormation template that does all the work.
VPC
As mentioned previously, we need to run Lambda from inside a VPC, below are the steps and resources to create the VPC:
create a VPC with 2 subnets in a single Availability Zone
attach an Internet Gateway to the VPC
create 2 Route Tables and associate each with the relevant subnet
in the Public Subnet route table, we add a default route so the requests to any IP (
0.0.0.0/0) to be routed through the Internet Gateway. This gives all resources created in the Public Subnet internet access.note the Private Subnet route table has no routes, we'll add that later
VPC:
    Type: AWS::EC2::VPC
    Properties:
        CidrBlock: !Ref VpcCIDR
        EnableDnsSupport: true
        EnableDnsHostnames: true
        Tags:
            - Key: Name
              Value: !Sub ${AWS::StackName}
InternetGateway:
    Type: AWS::EC2::InternetGateway
    Properties:
        Tags:
            - Key: Name
              Value: !Sub ${AWS::StackName}
InternetGatewayAttachment:
    Type: AWS::EC2::VPCGatewayAttachment
    Properties:
        InternetGatewayId: !Ref InternetGateway
        VpcId: !Ref VPC
PublicSubnet:
    Type: AWS::EC2::Subnet
    Properties:
        VpcId: !Ref VPC
        AvailabilityZone: !Select [0, !GetAZs ""]
        CidrBlock: !Ref PublicSubnetCIDR
        MapPublicIpOnLaunch: true
        Tags:
            - Key: Name
              Value: !Sub ${AWS::StackName} Public Subnet
PublicRouteTable:
    Type: AWS::EC2::RouteTable
    Properties:
        VpcId: !Ref VPC
        Tags:
            - Key: Name
              Value: !Sub ${AWS::StackName} Public Routes
DefaultPublicRoute:
    Type: AWS::EC2::Route
    DependsOn: InternetGatewayAttachment
    Properties:
        RouteTableId: !Ref PublicRouteTable
        DestinationCidrBlock: 0.0.0.0/0
        GatewayId: !Ref InternetGateway
PublicSubnetRouteTableAssociation:
    Type: AWS::EC2::SubnetRouteTableAssociation
    Properties:
        RouteTableId: !Ref PublicRouteTable
        SubnetId: !Ref PublicSubnet
PrivateSubnet:
    Type: AWS::EC2::Subnet
    Properties:
        VpcId: !Ref VPC
        AvailabilityZone: !Select [0, !GetAZs ""]
        CidrBlock: !Ref PrivateSubnetCIDR
        MapPublicIpOnLaunch: true
        Tags:
            - Key: Name
              Value: !Sub ${AWS::StackName} Private Subnet
PrivateRouteTable:
    Type: AWS::EC2::RouteTable
    Properties:
        VpcId: !Ref VPC
        Tags:
            - Key: Name
              Value: !Sub ${AWS::StackName} Private Routes
PrivateSubnetRouteTableAssociation:
    Type: AWS::EC2::SubnetRouteTableAssociation
    Properties:
        RouteTableId: !Ref PrivateRouteTable
        SubnetId: !Ref PrivateSubnet
Elastic IP
The Elastic IP will give us the fixed IP that we need to whitelist on the 3rd-party services. It will be associated with the EC2 instance at launch time.
Note the Elastic IP is free as long it is associated with a running instance. If it is not associated, or associated with a stopped instance it will cost $0.005/hr.
ElasticIP:
    Type: AWS::EC2::EIP
    Properties:
        Tags:
            - Key: Name
              Value: !Sub ${AWS::StackName}-ElasticIP
NAT Instance
NAT Instance IAM Role
First, we have to create an IAM Role that can be assumed by our EC2 Instance in order to do the following actions:
ec2:AssociateAddress- to associate the Elastic IPec2:ModifyInstanceAttribute- to update the EC2 instance attributeec2:CreateRouteandec2:ReplaceRoute- to create/replace the route in the Private Subnet route table
Also, note the AmazonSSMManagedInstanceCore managed policy, which allows using AWS Systems Manager to Run Command or Session Manager.
NATInstanceRole:
    Type: AWS::IAM::Role
    Properties:
        Path: /
        RoleName: !Sub ${AWS::StackName}-NATInstanceRole
        AssumeRolePolicyDocument:
            Version: "2012-10-17"
            Statement:
                - Effect: Allow
                  Principal:
                      Service:
                          - ec2.amazonaws.com
                  Action: sts:AssumeRole
        ManagedPolicyArns:
            - arn:aws:iam::aws:policy/AmazonSSMManagedInstanceCore
        Policies:
            - PolicyName: !Sub ${AWS::StackName}-NATInstancePolicy
              PolicyDocument:
                  Version: "2012-10-17"
                  Statement:
                      - Effect: Allow
                        Action:
                            - ec2:AssociateAddress
                            - ec2:ReplaceRoute
                            - ec2:CreateRoute
                            - ec2:ModifyInstanceAttribute
                        Resource: "*"
NATInstanceProfile:
    Type: AWS::IAM::InstanceProfile
    Properties:
        Path: /
        InstanceProfileName: !Sub ${AWS::StackName}-NATInstanceProfile
        Roles:
            - !Ref NATInstanceRole
NAT Instance Security Group
The Security Group restricts the inbound connections to our NAT Instance only to resources from our VPC.
NATInstanceSecurityGroup:
    Type: AWS::EC2::SecurityGroup
    Properties:
        GroupDescription: !Sub ${AWS::StackName} NAT Instance SG
        VpcId: !Ref VPC
        SecurityGroupIngress:
            - IpProtocol: tcp
              FromPort: 0
              ToPort: 65535
              CidrIp: !Ref VpcCIDR
        Tags:
            - Key: Name
              Value: !Sub ${AWS::StackName} NAT Instance SG
Autoscaling
We're going to launch the NAT Instance in the Public Subnet using EC2 Auto Scaling, there are no additional fees for it, and the service can automatically determine the health status of our instance using EC2 status checks.
If the NAT Instance is unhealthy, it will be terminated and replaced by a new one with minimum downtime. The AutoScalingGroup will make sure we have 1 healthy instance running at all times.
When our instance gets terminated and a new one gets created, the new instance will have a different IP, and that's the reason we didn't create a route in the private route table.
AutoScalingGroup:
    Type: AWS::AutoScaling::AutoScalingGroup
    Properties:
        VPCZoneIdentifier:
            - !Ref PublicSubnet
        LaunchTemplate:
            LaunchTemplateId: !Ref LaunchTemplate
            Version: !GetAtt LaunchTemplate.LatestVersionNumber
        MinSize: 1
        MaxSize: 1
        DesiredCapacity: 1
        Tags:
            - Key: Name
              Value: !Sub ${AWS::StackName} NAT Instance
              PropagateAtLaunch: true

LaunchTemplate:
    Type: AWS::EC2::LaunchTemplate
    Properties:
        LaunchTemplateName: !Sub ${AWS::StackName}-LaunchTemplate
        LaunchTemplateData:
            ImageId: !Ref EC2InstanceAmi
            InstanceType: !Ref EC2InstanceType
            IamInstanceProfile:
                Arn: !GetAtt NATInstanceProfile.Arn
            SecurityGroupIds:
                - !Ref NATInstanceSecurityGroup
            UserData:
                Fn::Base64: !Sub |
                    #!/bin/sh
                    # ... removed for brevity
UserData
The UserData property allows specifying a shell script that will run each time the instance is launched. If our Autoscaling group terminates an unhealthy instance, the new instance will execute this script at launch and automatically set up the NAT Instance.
Here's what it does:
updates all existing packages and installs the
iptables-servicespackageenables IP forwarding
configures NAT routing
Associates the Elastic IP to the EC2 instance, the public IP of the instance will be the Elastic IP, and all requests that pass through this instance will appear as coming from this IP address.
Disables EC2 instance source/destination check. This is enabled by default forcing the instance to be the source or destination of any traffic it sends or receives. For NAT we need the traffic to pass through.
Creates/updates the route in the Private Subnet route table. We're adding a default route so the requests made by our resources in the Private Subnet (Lambda) to any destination (
0.0.0.0/0) to be routed through the NAT Instance.
# update packages
yum update -y
# install iptable
yum install -y iptables-services
# enable iptable
systemctl enable iptables.service
# enable IP forwarding
sysctl -w net.ipv4.ip_forward=1
# configure NAT
iptables -t nat -A POSTROUTING -o eth0 -j MASQUERADE
# save iptable
service iptables save
# start iptable
service iptables start

# get instance-id
EC2_INSTANCE_ID=$(curl -s http://instance-data/latest/meta-data/instance-id)

# associate the Elastic IP address to the instance
aws ec2 associate-address --instance-id $EC2_INSTANCE_ID --allocation-id ${ElasticIP.AllocationId} --allow-reassociation  --region ${AWS::Region}

# disable source/destination check
aws ec2 modify-instance-attribute --instance-id $EC2_INSTANCE_ID --source-dest-check "{\"Value\": false}" --region ${AWS::Region}

# replace or create route in the default private route table
aws ec2 replace-route --route-table-id ${PrivateRouteTable} --destination-cidr-block "0.0.0.0/0" --instance-id $EC2_INSTANCE_ID --region ${AWS::Region} || aws ec2 create-route --route-table-id ${PrivateRouteTable} --destination-cidr-block "0.0.0.0/0" --instance-id $EC2_INSTANCE_ID --region ${AWS::Region}
Lambda Function
To run inside a VPC our Lambda function needs permissions to create and manage network interfaces (ENI) and be associated with a subnet and a security group.
We created the Private Subnet previously with the VPC, so we'll create a new IAM Role that will be assumed by our Lambda and the Security Group.
Lambda Execution Role & Security Group
The Lambda execution role is attached the AWSLambdaVPCAccessExecutionRole managed policy which grants permissions to manage ENIs within an Amazon VPC and write to CloudWatch Logs.
NodeLambdaExecutionRole:
    Type: AWS::IAM::Role
    Properties:
        Path: /
        RoleName: !Sub ${AWS::StackName}-NodeLambdaExecutionRole
        AssumeRolePolicyDocument:
            Version: "2012-10-17"
            Statement:
                - Effect: Allow
                  Principal:
                      Service:
                          - lambda.amazonaws.com
                  Action: sts:AssumeRole
        ManagedPolicyArns:
            - arn:aws:iam::aws:policy/service-role/AWSLambdaVPCAccessExecutionRole

NodeLambdaSecurityGroup:
    Type: AWS::EC2::SecurityGroup
    Properties:
        GroupDescription: !Sub ${AWS::StackName} Node Lambda SG
        VpcId: !Ref VPC
        Tags:
            - Key: Name
              Value: !Sub ${AWS::StackName} Node Lambda SG
Lambda Function Code
For demo purposes, I included a simple NodeJS Lambda function in the stack that calls the Ipify API and checks if the request made by Lambda comes from the Elastic IP.
exports.handler = async (event) => {
    const https = require("https");
    const url = "https://api.ipify.org?format=json";
    const response = await new Promise((resolve, reject) => {
        https
            .get(url, (res) => {
                let data = "";
                res.on("data", (chunk) => {
                    data += chunk;
                });
                res.on("end", () => {
                    resolve(JSON.parse(data));
                });
            })
            .on("error", (err) => {
                reject(err);
            });
    });
    return { elastic_ip: process.env.ELASTIC_IP, source_ip: response.ip };
};
Deploying the Lambda Function
As our function code is up to 4096 chars we can deploy it as a CloudFormation resource using inline code. Note that we pass the ELASTIC_IP as an environment variable so our code can reference it.
NodeLambdaFunction:
    Type: AWS::Lambda::Function
    Properties:
        Code:
            ZipFile: |
                # ... function code omitted for brevity
        Handler: index.handler
        Role: !GetAtt NodeLambdaExecutionRole.Arn
        Runtime: nodejs18.x
        Timeout: 30
        Environment:
            Variables:
                ELASTIC_IP: !Ref ElasticIP
        VpcConfig:
            SecurityGroupIds:
                - !Ref NodeLambdaSecurityGroup
            SubnetIds:
                - !Ref PrivateSubnet
Summary
Here's the 1-click Deployment link to get going quickly, or click to view the complete self-contained Cloudformation template that can be deployed into any AWS account.