Automatically deploy Serverless applications on AWS using GitHub Actions

An architect by trade, practicing architecture in the Cloud. 7x AWS Certified, AWS Community Builder, Serverless advocate, Vue enthusiast.
I use serverless a lot. 🤷🏽♂️
Most of the projects I have created lately are serverless, but I also use it to extend existing apps running in classic infrastructures and offload the resource-intensive tasks (i.e. image processing).
I use AWS as the serverless provider and Node.js to code the Lambda functions.
In the early days, I did everything manually from the AWS console, but it's cumbersome, not very scalable, and configuration drifts can happen so subtly that it’s very easy to lose track.
AWS best practices recommend deploying apps using Infrastructure-as-Code (IAC).
Using a framework like Serverless, in combination with version control, makes it really easy to track every change that's made to the app code & infrastructure.
The Serverless framework enables us to build AWS CloudFormation templates to describe the resources to be deployed into the cloud and uses the AWS CLI to deploy them. It makes the deployment as easy as typing:
sls deploy
Ok, I have the app & infra code already in a GitHub repository, why not automate the deployment process?
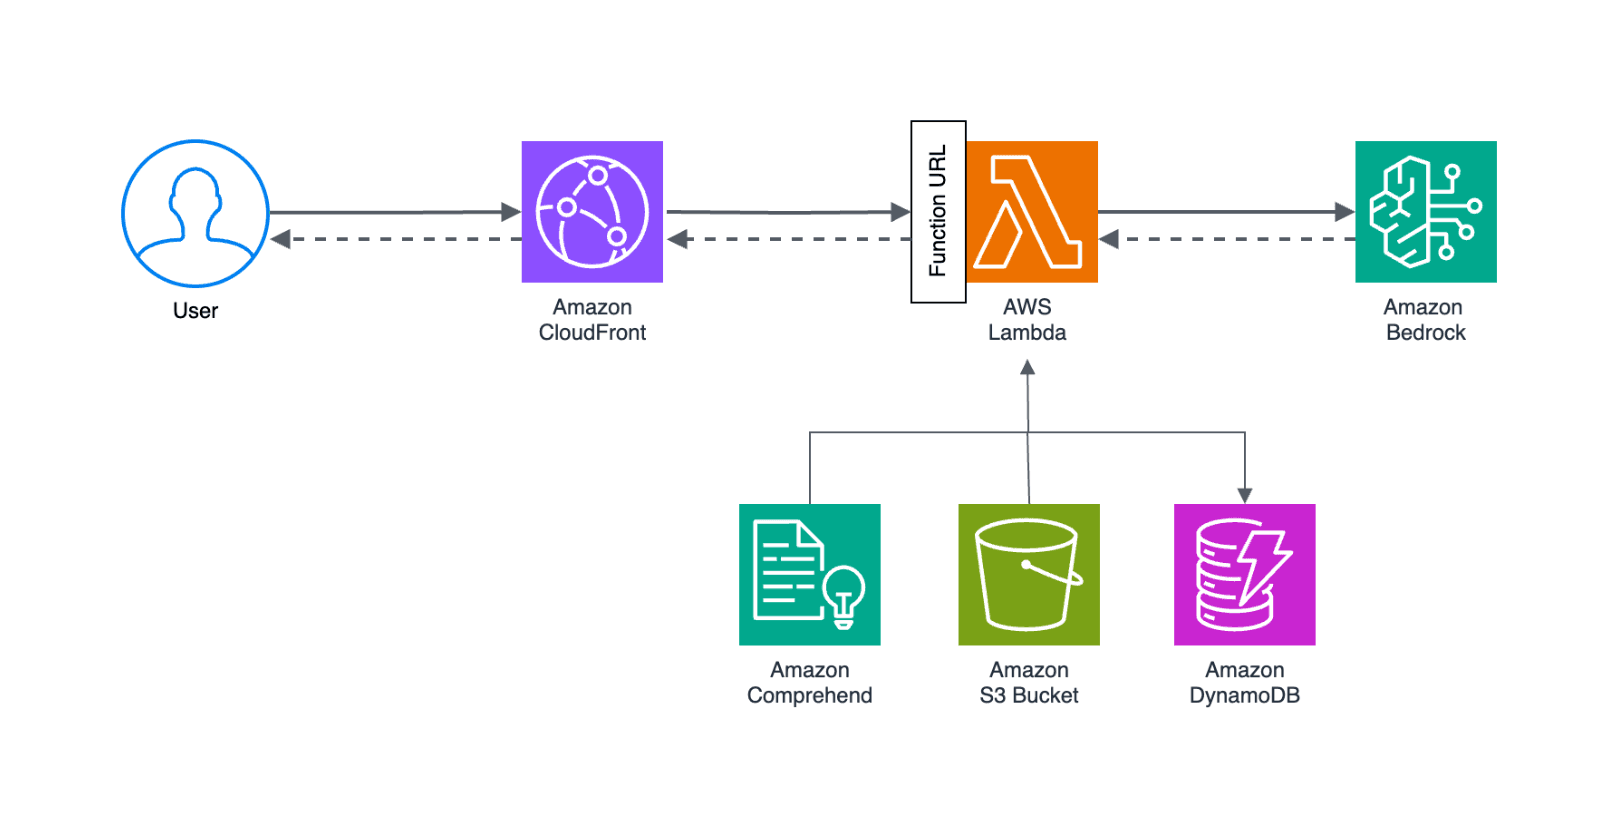
Serverless overview
The foundation of a serverless application consists of a serverless.yml file and an env.yml file.
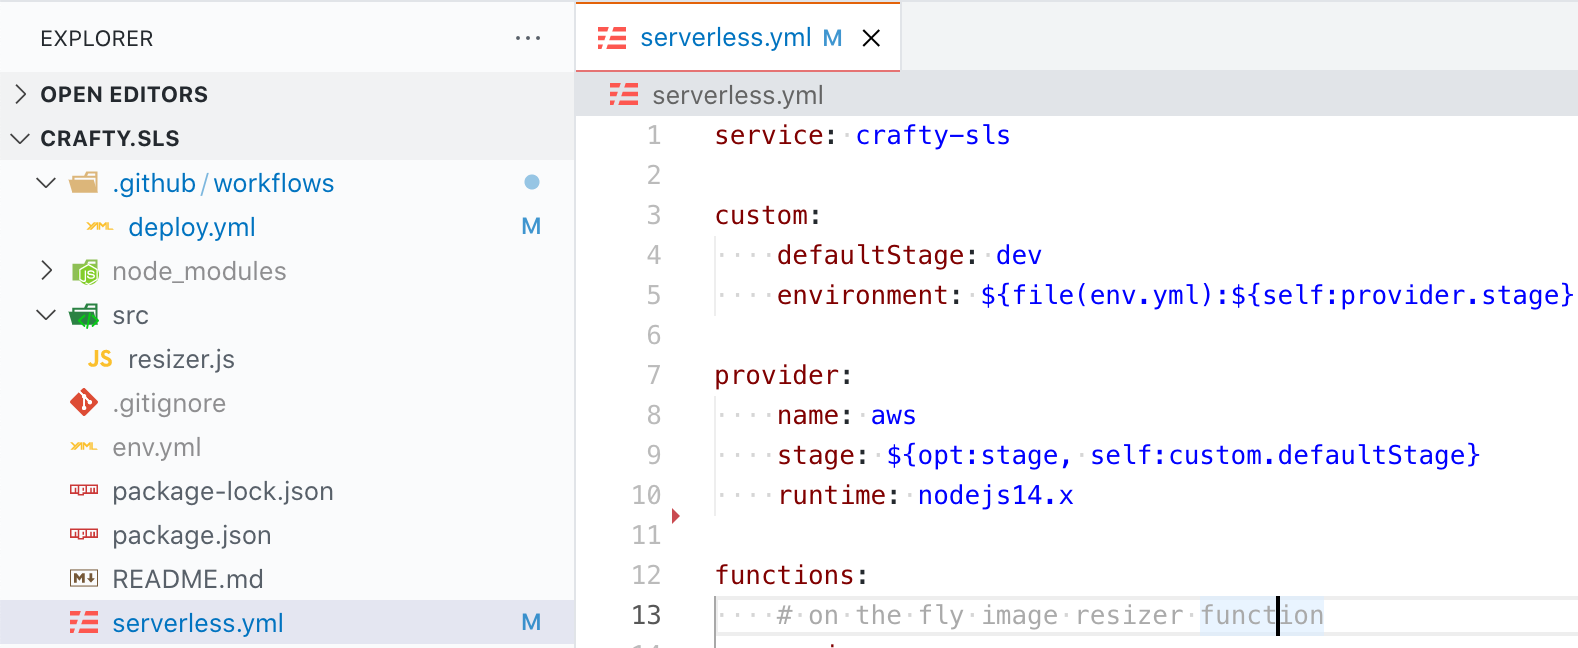
The serverless.yml is the heart of a serverless application, it describes the entire infrastructure, all the way from the programming language to resource access.
service: my-service-name

custom:
    defaultStage: dev
    environment: ${file(env.yml):${self:provider.stage}, file(env.yml):dev}

provider:
    name: aws
    stage: ${opt:stage, self:custom.defaultStage}
    runtime: nodejs14.x

functions:
    # on the fly image resizer function
    resizer:
        handler: src/resizer.handler
        memorySize: 1024
        timeout: 15
        environment:
            AWS_KEY: ${self:custom.environment.AWS_KEY}
            AWS_SECRET: ${self:custom.environment.AWS_SECRET}
            BUCKET: ${self:custom.environment.S3_BUCKET}
            CDN_URL: ${self:custom.environment.CDN_URL}
        events:
            - http:
                  path: /resizer
                  method: GET

#optional plugins
plugins:
    - serverless-offline
The env.yml file stores the environment variables that are used in the application code (i.e. API keys)
add env.yml to .gitignore, don't commit it to the repo.
Some developers prefer to store the environment variables into JSON files instead of YML, the workflow is similar.
prod:
    name: "crafty"
    AWS_KEY: "MYAWSKEY" # add your AWS Key
    AWS_SECRET: "MYAWSSECRET" # add your AWS Secret
    S3_BUCKET: "crafty-products"
    CDN_URL: "https://mycdnurl.com"

dev:
    name: "DEV - crafty"
    AWS_KEY: "MYAWSKEY" # add your AWS Key
    AWS_SECRET: "MYAWSSECRET" # add your AWS Secret
    S3_BUCKET: "crafty-products-dev"
    CDN_URL: "https://mycdnurl.com"
Tip: I use the Serverless Offline plugin which emulates AWS Lambda and API Gateway on my local machine, allows me to test stuff locally, and speeds up the development cycles.
We'll assume we have a basic Serverless app ready to be deployed so let's jump right into how to automate this workflow.
Create the IAM user
There are two different IAM entities (users or roles) that you need to worry about when working with the Serverless framework:
The IAM user used by the Framework to deploy our Serverless service (the Framework user)
The IAM role used by a Lambda function when it's executed (a function role).
Below we'll create the IAM user that's needed by the framework to deploy our app & service, the framework user.
Log in to the AWS account and go to the Identity & Access Management (IAM)
Go to Users and click "Add users" > pick a username that'll be easier to remember, I prefer to prefix users for GitHub actions with github_sls > check "Programmatic access"
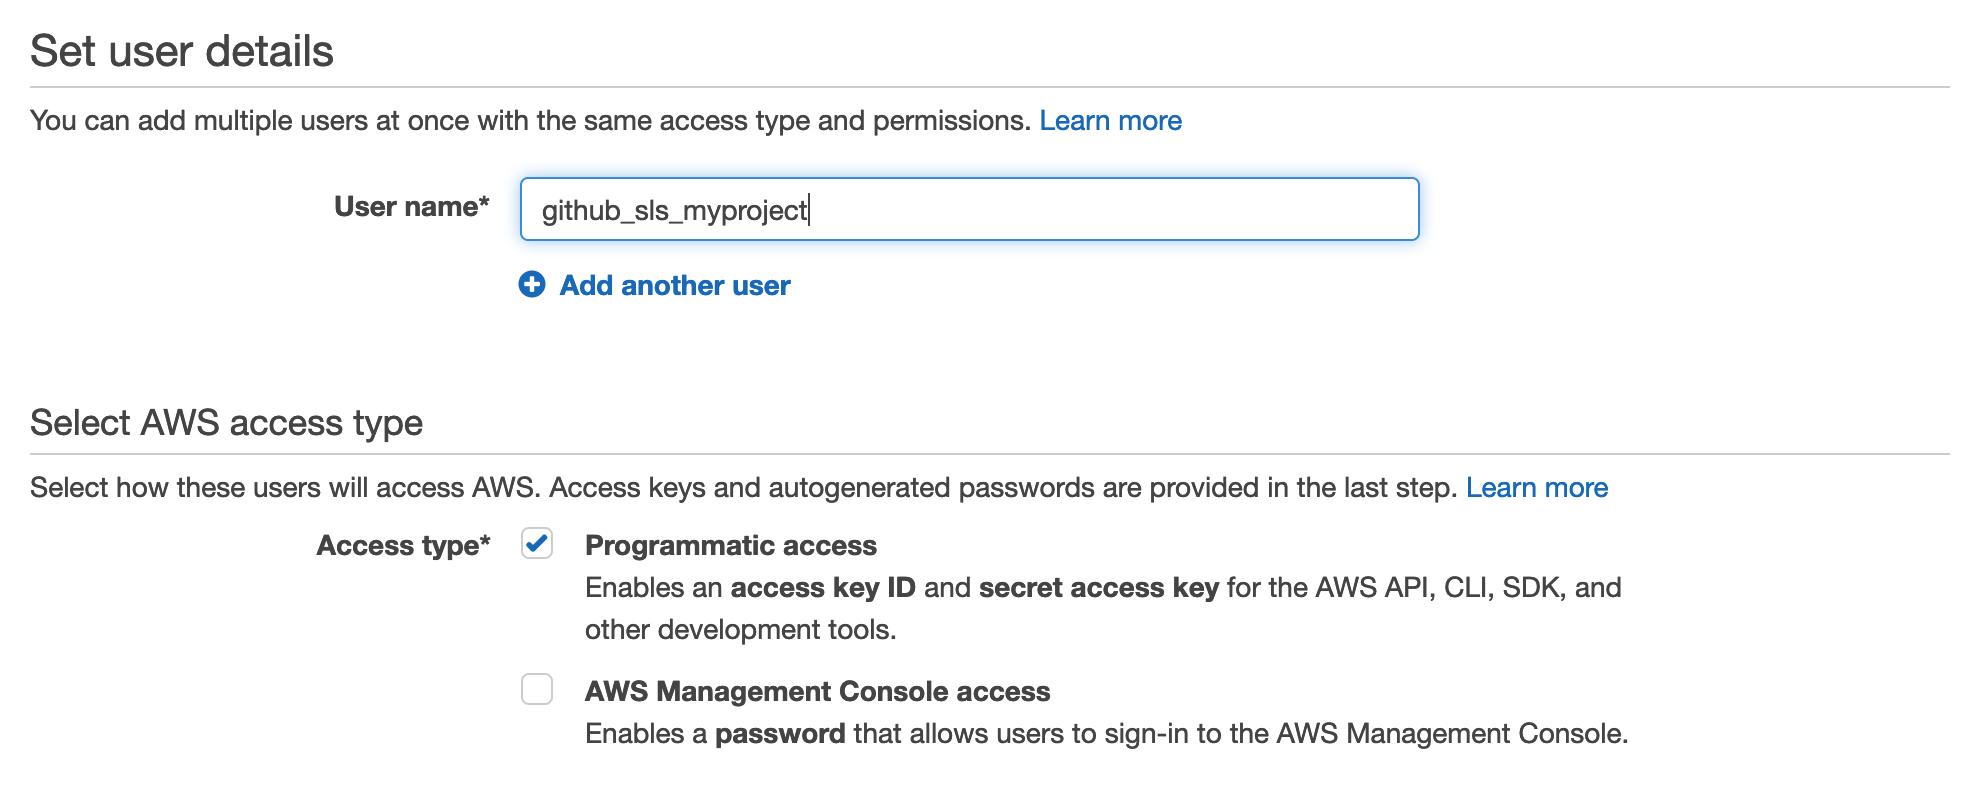
Click "Next" to go through to the Permissions page, click on "Attach existing policies" directly, and select AdministratorAccess
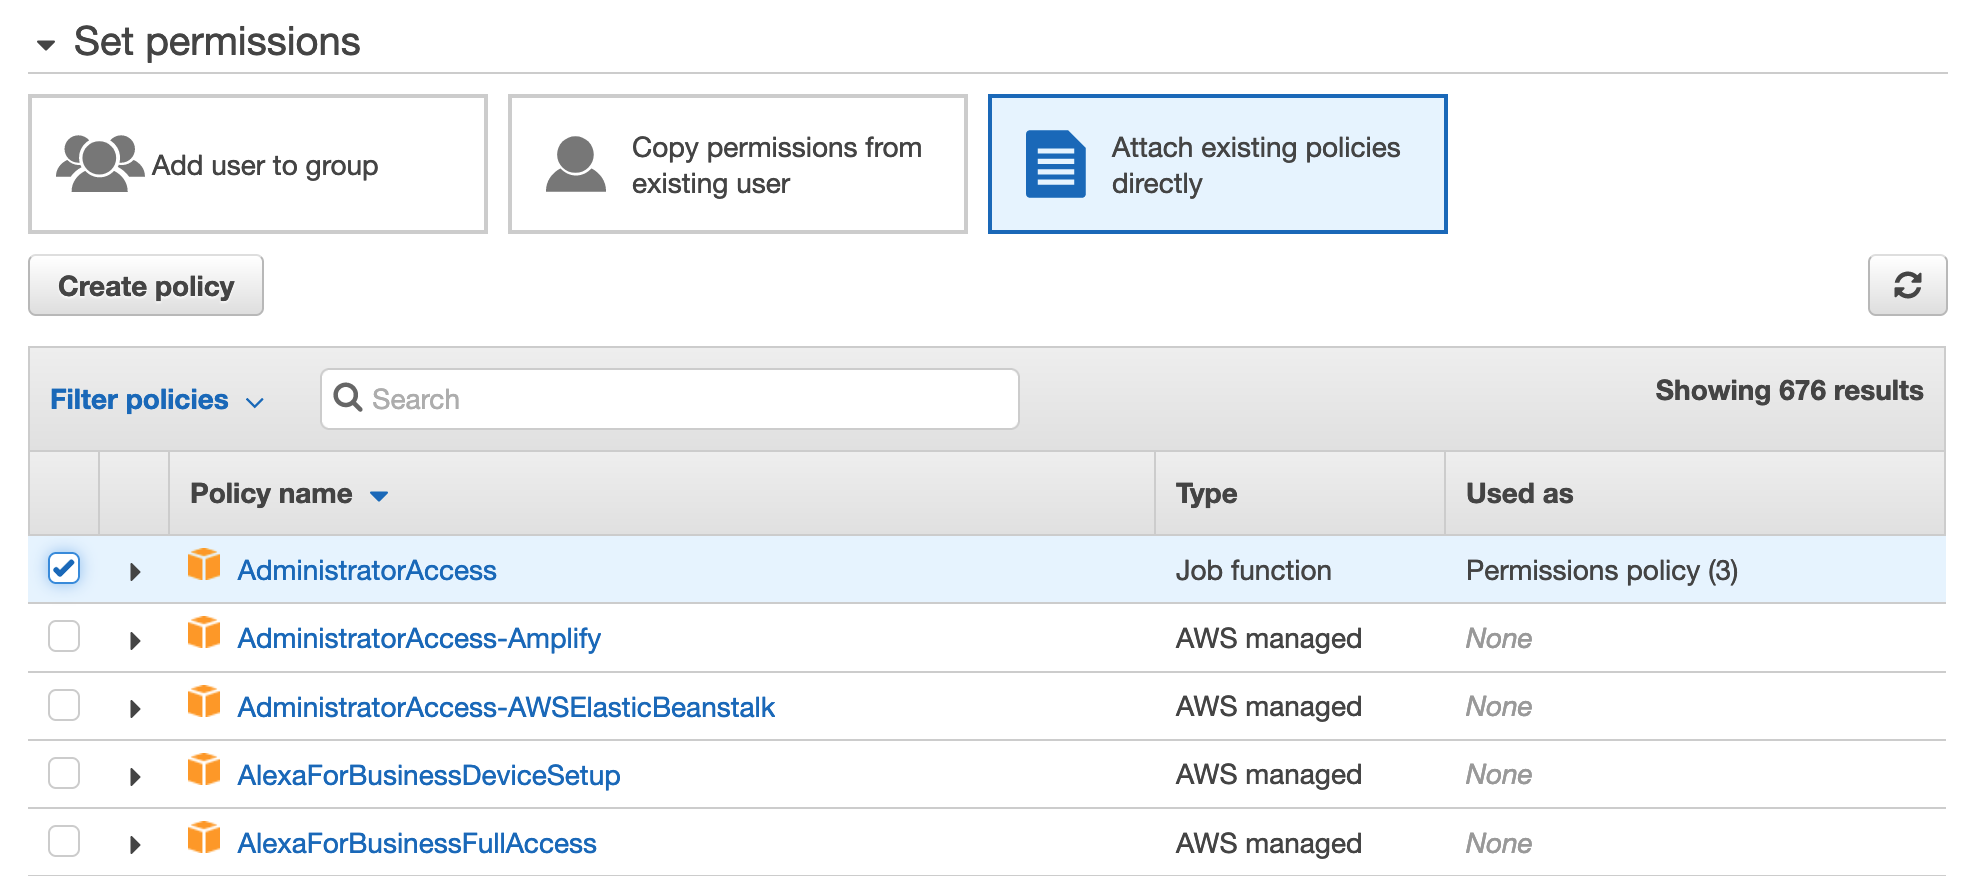
View and copy the API Key & Secret to a temporary place, we'll need them shortly.
To set more restrictive access and follow the principle of least privilege, I recommend checking this post of Michael Timbs and read more about the minimum IAM roles for deploying a serverless project.
GitHub Actions
First, we have to store the AWS Key and AWS Secret that have AdministratorAccess and will be used by Serverless for deployment.
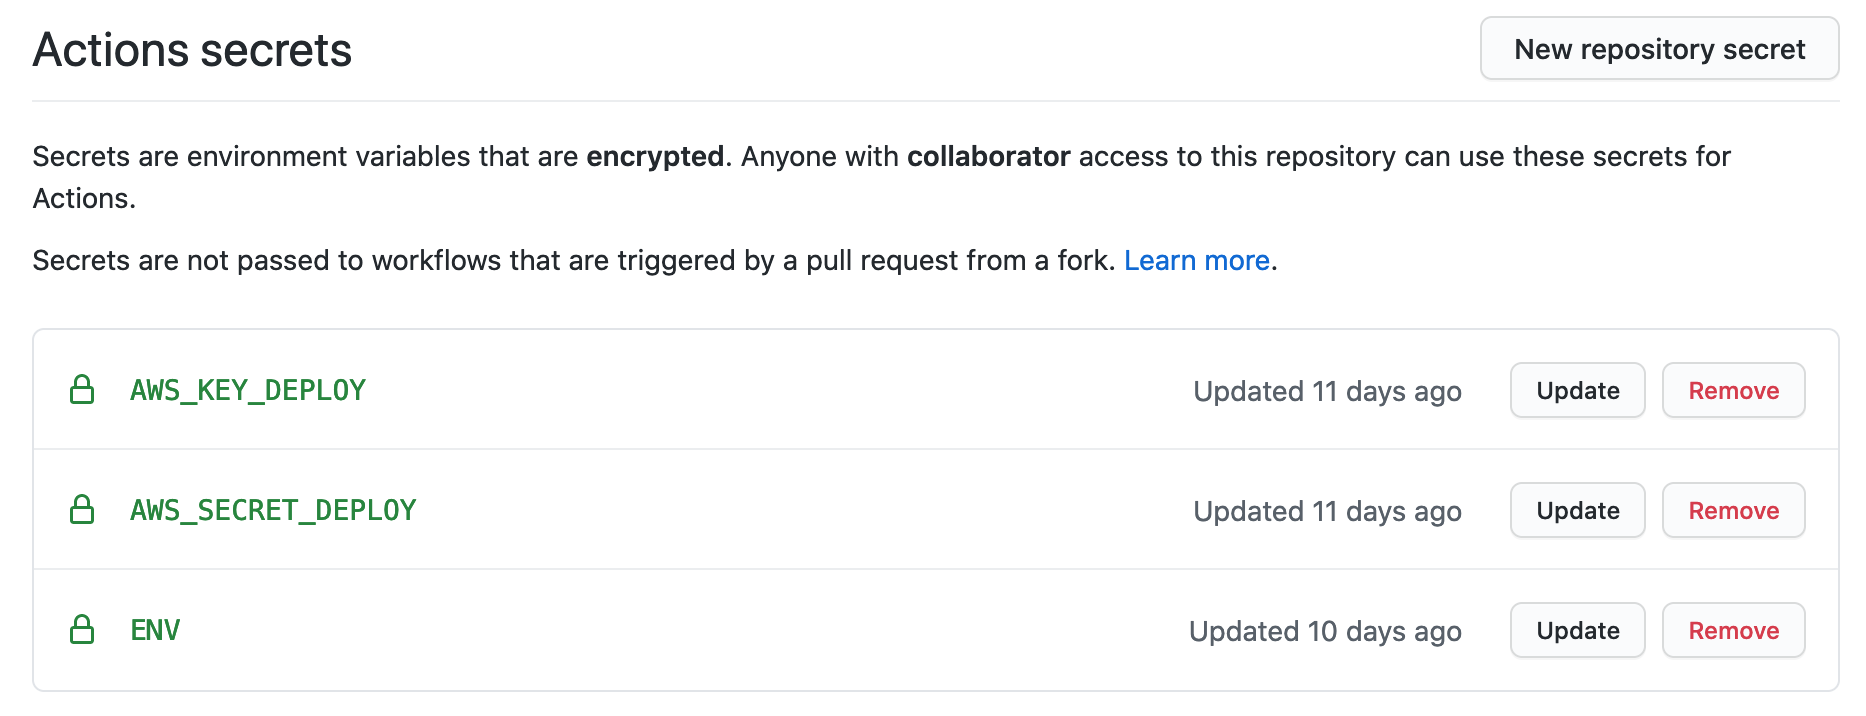
Go into GitHub repository Settings > Secrets:
add the newly created AWS API Key & Secret as AWS_KEY_DEPLOY & AWS_SECRET_DEPLOY
add the content of the env.yml file in the ENV secret
Keep in mind that all the secrets stored in Github are encrypted, we won't able to view them after creation, just to update the value or remove them.
Next, we have to create a YAML file to define the action workflow configuration, which can be done in two ways:
- from the GitHub repo, click Actions and create a workflow
- define YAML files and store them in .github/workflows in your application root
This is a sample YAML used to describe the GitHub action workflow that deploys the app on every commit in the main branch.
name: Deploy Production
# on main branch updates
on:
    push:
        branches:
            - main
jobs:
    deploy:
        runs-on: ubuntu-latest
        steps:
            - uses: actions/checkout@v1
            - uses: actions/setup-node@v1
              with:
                  node-version: "12.x"
              #install serverless
            - name: Install Serverless Framework
              run: npm install -g serverless
              # authentication
            - name: Serverless AWS authentication
              run: sls config credentials --provider aws --key ${{ secrets.AWS_KEY_DEPLOY }} --secret ${{ secrets.AWS_SECRET_DEPLOY }}
              # create ENV, use the shell `cat` command to create env.yml from secrets
            - name: Create env file
              run: |
                  cat > env.yml << EOF
                  ${{ secrets.ENV }}
                  EOF
              #install node modules
            - name: Install NPM dependencies
              run: npm install
              #serverless deploy
            - name: Deploy
              run: sls deploy -s prod
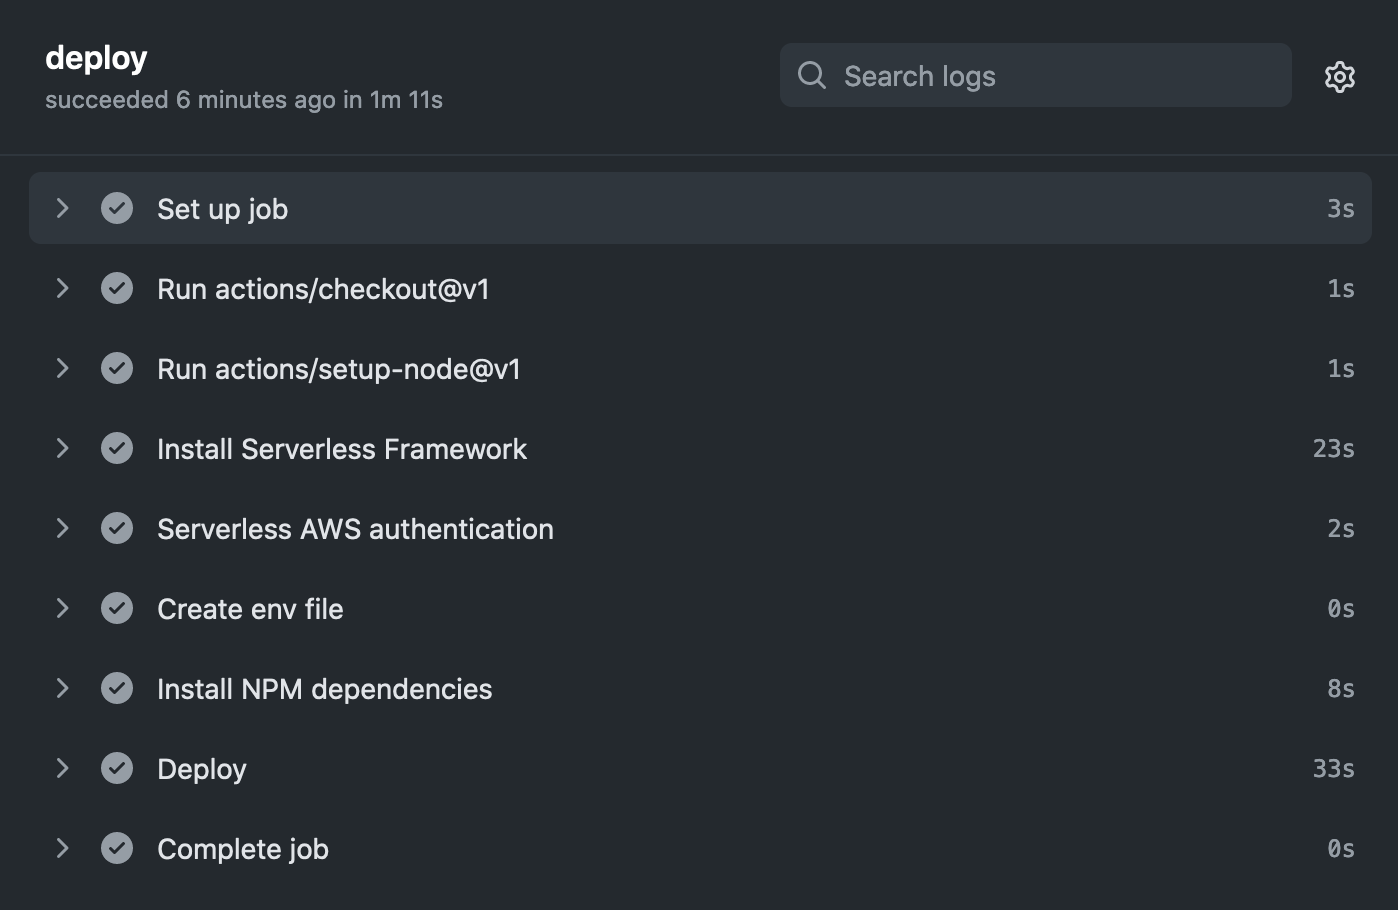
And this is how the workflow log looks like.
Not that hard, isn't it?