How to run a highly-available Typesense search in AWS
Get a multi-node Typesense cluster up & running in minutes on AWS using infrastructure as code
Retrieving relevant search results blazing-fast is a challenge. A solid search requires typo tolerance, result rankings, synonyms, filtering, faceting, geo search, and so on.
Quite often the underlying database schema is not optimized for our search needs, the relevance of search results is questionable, and running ad-hoc queries on big datasets usually leads to performance issues and slow response.
This is why you should add a dedicated search service into the mix.
Typesense is my favorite, it's simple, fast, typo-tolerant, and open-source. I've been using it on multiple production projects handling searches on datasets of millions of entries.
For production use, it is recommended to run a multi-node Typesense cluster, however, if you're looking for a lighter setup check my other post on how to run a single Typesense node in AWS.
In this article, I will explain how to get a highly available (multi-node) Typesense cluster running in AWS using infrastructure as code.
The setup uses 2 AWS CloudFormation stacks that can be deployed into any AWS account:
the Network Stack (1-click deployment) - creates the VPC and subnets in 3 AZs
the Cluster Stack (1-click deployment)- creates all the cluster resources
How it Works
Typesense uses the Raft consensus algorithm to manage the cluster and recover from node failures. In cluster mode, Typesense will automatically replicate the entire dataset to all nodes. Automatically and continuously.
Raft requires a quorum for consensus and we need to run a minimum of 3 nodes to tolerate a 1-node failure, and a 5-node cluster will tolerate failures of up to 2 nodes, but at the expense of slightly higher write latencies.

To start a Typesense node as part of a cluster, each node instance needs to have a definition file with the list of all nodes in the following format, separated by commas:
<peering_address>:<peering_port>:<api_port>
The
peering_address(the EC2 instance private IP address)The
peering_port(the port used for cluster operations - default8107)The
api_port(the port to which clients connect to - default8108)
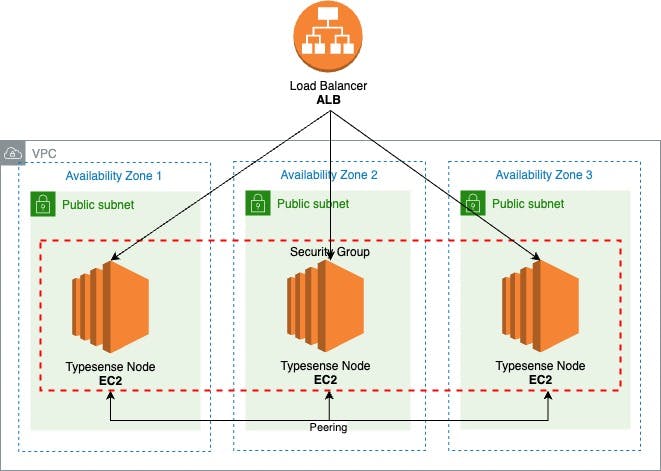
We will use an Auto Scaling group to launch a minimum of 3 EC2 Instances distributed across 3 Availability Zones and start a Typesense service on each.
# ASG
AutoScalingGroup:
    Type: AWS::AutoScaling::AutoScalingGroup
    Properties:
        LaunchConfigurationName: !Ref LaunchConfig
        DesiredCapacity: 3
        MinSize: 3
        MaxSize: 6
        NotificationConfigurations:
            - NotificationTypes:
                  - autoscaling:EC2_INSTANCE_TERMINATE
              TopicARN: !Ref EC2EventsTopic
        TargetGroupARNs:
            - !Ref ALBTargetGroup
        VPCZoneIdentifier:
            - !ImportValue typesense-vpc-PublicSubnet1
            - !ImportValue typesense-vpc-PublicSubnet2
            - !ImportValue typesense-vpc-PublicSubnet3
EC2 Instance Type
CPU capacity is important to handle concurrent search traffic and indexing operations, so Typesense requires at least 2 vCPUs of compute capacity to operate.
All the next-gen EC2 T4g instances have at least 2 vCPUs, they're powered by Arm-based AWS Graviton2 processors and are ideal for running applications with moderate CPU usage that experience temporary spikes in usage.
The amount of RAM required is completely dependent on the size of the data you index, but for Typesense to hold the whole index in memory, the instance memory should be 2-3X the size of the data set.
As the Typesense process, itself is quite lightweight (20MB RAM with empty dataset) a 2GB memory instance (t4g.small) will likely handle a data set of up to 1GB.
Data Storage
Typesense stores a copy of the raw data on disk and then builds the in-memory index with the data. Then at search time, after determining the final set of documents to return in the API response, it fetches these documents (only) from the disk and puts them in the API response.
We'll use the Amazon EC2 instance store for the node data, although this type of storage is ephemeral and data will be lost if the instance gets terminated. When a new instance is launched the data will be replicated from the other nodes automatically.
We'll have scheduled backups for our peace of mind.
Load Balancing
AWS Elastic Load Balancing is used to distribute the traffic equally across all nodes, and we're going to add an Application Load Balancer in front of our EC2 instances from all 3 Availability Zones. It will also help us manage the SSL termination.
ALB:
    Type: AWS::ElasticLoadBalancingV2::LoadBalancer
    Properties:
        Name: !Sub ${AWS::StackName}-${EnvironmentType}
        Subnets:
            - !ImportValue typesense-vpc-PublicSubnet1
            - !ImportValue typesense-vpc-PublicSubnet2
            - !ImportValue typesense-vpc-PublicSubnet3
        SecurityGroups:
            - !GetAtt ALBSecurityGroup.GroupId
The ALB Security Group allows inbound traffic on ports 80 (HTTP) and 443 (HTTPS).
ALBSecurityGroup:
    Type: AWS::EC2::SecurityGroup
    Properties:
        GroupDescription: allow traffic on port 80
        VpcId: !ImportValue typesense-vpc-VPCID
        SecurityGroupIngress:
            - IpProtocol: tcp
              FromPort: 80
              ToPort: 80
              CidrIp: 0.0.0.0/0
            - IpProtocol: tcp
              FromPort: 443
              ToPort: 443
              CidrIp: 0.0.0.0/0
We have 2 ALB listeners:
one for HTTPS that will forward traffic to the Target Group
one for HTTP that will redirect all requests to HTTPS
ALBHttpsListener:
    Type: AWS::ElasticLoadBalancingV2::Listener
    Properties:
        DefaultActions:
            - Type: forward
              TargetGroupArn: !Ref ALBTargetGroup
        LoadBalancerArn: !Ref ALB
        Certificates:
            - CertificateArn: !Ref ALBCertificate
        Port: 443
        Protocol: HTTPS
ALBListener:
    Type: AWS::ElasticLoadBalancingV2::Listener
    Properties:
        DefaultActions:
            - Type: redirect
              RedirectConfig:
                  Host: "#{host}"
                  Path: "/#{path}"
                  Port: 443
                  Protocol: "HTTPS"
                  Query: "#{query}"
                  StatusCode: HTTP_301
        LoadBalancerArn: !Ref ALB
        Port: 80
        Protocol: HTTP
And finally, the Target Group routes requests to our nodes.
The Target Group also performs health checks on our nodes, it uses Typesense's /health endpoint that will return an HTTP code 200 and {"ok": true} if our node search service is in a working state.
ALBTargetGroup:
    Type: AWS::ElasticLoadBalancingV2::TargetGroup
    Properties:
        HealthCheckIntervalSeconds: 30
        HealthCheckProtocol: HTTP
        HealthCheckTimeoutSeconds: 15
        HealthyThresholdCount: 5
        HealthCheckPath: /health
        Matcher:
            HttpCode: 200
        Name: !Sub ${AWS::StackName}-${EnvironmentType}
        Port: 8108
        Protocol: HTTP
        UnhealthyThresholdCount: 3
        VpcId: !ImportValue typesense-vpc-VPCID
So we have two health checks in place for our highly available search service:
Auto Scaling group that checks if our instance is healthy
Load Balancer health checks will check if our application running on the instance is healthy
Node Launching
The Launch Configuration will be used by the Auto Scaling group to configure our EC2 instances (search nodes).
LaunchConfig:
    Type: AWS::AutoScaling::LaunchConfiguration
    Properties:
        InstanceType: !Ref InstanceType
        ImageId: !Ref LatestLinuxAmiId
        IamInstanceProfile: !GetAtt EC2InstanceProfile.Arn
        SecurityGroups:
            - !Ref EC2SecurityGroup
        UserData:
            Fn::Base64: !Sub |
                # [...] removed for brevity plese check below
Launch Configuration UserData
UserData allows us to run commands on our instance at launch. When an unhealthy instance is terminated and a new one is created and the UserData will run the commands to ensure the cluster node is reconfigured back to its running state.
1. CloudWatch Agent
We want to monitor our nodes, CloudWatch Agent will collect metrics and logs from our EC2 instances and send them to CloudWatch. The CloudWatch configuration is created by the CloudFormation template and referenced in the commands below.
# install cloudwatch agent
yum -y install amazon-cloudwatch-agent
# auto configure cloudwatch agent
/opt/aws/amazon-cloudwatch-agent/bin/amazon-cloudwatch-agent-ctl -a fetch-config -m ec2 -c ssm:${CloudWatchAgentConfig} -s
2. Download & Install Typesense Server
We'll run the service on T4g instances powered by Graviton2 processors running Amazon Linux and there's no package available, so we have to download the arm64 Binary.
# download & unarchive typesense
curl -O https://dl.typesense.org/releases/${TypesenseVersion}/typesense-server-${TypesenseVersion}-linux-arm64.tar.gz
tar -xzf typesense-server-${TypesenseVersion}-linux-arm64.tar.gz -C /opt/typesense
# remove archive
rm typesense-server-${TypesenseVersion}-linux-arm64.tar.gz
3. Configure the Typesense Node
We get the EC2 Instance Private IP, create the Typesense data & log folders and the nodes and server config file. Read more about Typesense server config.
# get instance private IP
EC2_INSTANCE_IP=$(curl -s http://instance-data/latest/meta-data/local-ipv4)

# create typesense folders
mkdir -p /opt/typesense/data
mkdir -p /opt/typesense/log

# create the nodes file
echo "$EC2_INSTANCE_IP:${TypesensePeeringPort}:${TypesenseApiPort}" > /opt/typesense/nodes

# create typesense server config file
echo "[server]
api-key = ${TypesenseApiKey.Value}
data-dir = /opt/typesense/data
log-dir = /opt/typesense/log
enable-cors = true
api-port = ${TypesenseApiPort}
peering-port = ${TypesensePeeringPort}
peering-address = $EC2_INSTANCE_IP
nodes = /opt/typesense/nodes" > /opt/typesense/typesense.ini
4. Create systemd service & enable the daemon
As we installed it from a binary we have to create a systemd service for the Typesense server. This will make the Typesense server service always available.
# create typesense service
echo "[Unit]
Description=Typesense service
After=network.target

[Service]
Type=simple
Restart=always
RestartSec=5
User=ec2-user
ExecStart=/opt/typesense/typesense-server --config=/opt/typesense/typesense.ini

[Install]
WantedBy=default.target" > /etc/systemd/system/typesense.service

# start typesense service
systemctl start typesense
# enable typesense daemon
systemctl enable typesense
5. Notify Cluster
We publish a message using AWS CLI on the SNS topic that a new Typesense node is available.
# notify sns topic of the new instance
aws sns publish --message "New Instance Ready (instanceId:$EC2_INSTANCE_IP)" --topic-arn ${EC2EventsTopic}  --region ${AWS::Region}
Cluster Events
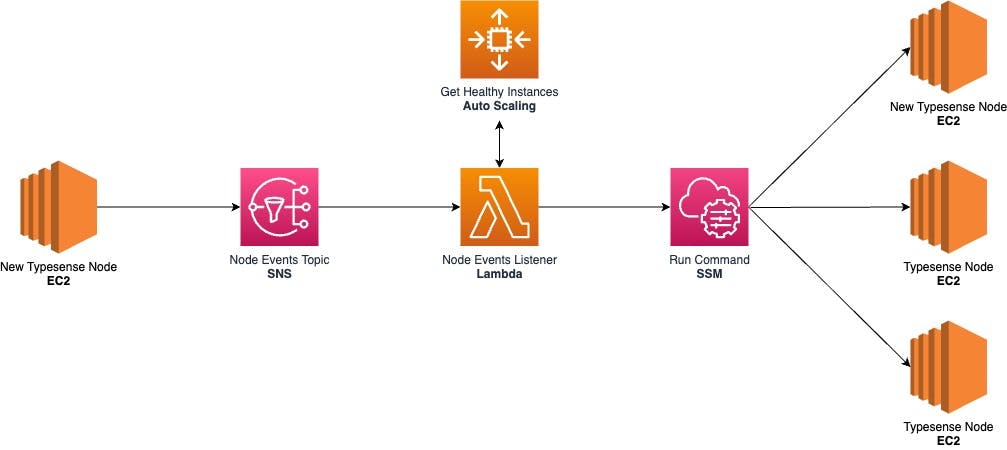
Every Typesense node needs to be aware of the other cluster nodes in order to automatically replicate the data. When a node instance is terminated or a new node is launched we need to update the configuration on the rest of the nodes.
An SNS topic will receive notifications from the Auto Scaling Group in case of an EC2_INSTANCE_TERMINATE event and also from the AWS CLI (UserData) once the new node is running.
The SNS will then trigger a Lambda that will send a command through the Systems Manager to all the healthy instances to update the nodes definition file.

Click here to view the cluster events listener Lambda code.
Systems Manager Run Command
AWS SSM helps us securely manage the configuration of our nodes and allows running a shell script on multiple instances at once. This facilitates updating the nodes definition of our Typesense service.
# SSM Document
UpdateNodesCommand:
    Type: AWS::SSM::Document
    Properties:
        Content:
            schemaVersion: "2.2"
            description: Update Typesense Nodes
            parameters:
                NodeList:
                    type: String
                    description: Nodes string
            mainSteps:
                - action: aws:runShellScript
                  name: updateTypesense
                  inputs:
                      runCommand:
                          - echo "{{NodeList}}" > /opt/typesense/nodes
                          - sudo systemctl restart typesense

        DocumentFormat: YAML
        DocumentType: Command
        Name: !Sub ${AWS::StackName}-${EnvironmentType}-update-nodes
        TargetType: /AWS::EC2::Instance
EC2 IAM Role & Security Groups
The template will create an Instance Profile, an IAM Role, and a Security Group for the EC2 instances.
The IAM Role will be assumed by the EC2 instance and contains policies that will allow only the necessary actions (principle of least privilege).
CloudWatchAgentServerPolicy- to read instance information and write it to CloudWatch Logs and MetricsAmazonSSMManagedInstanceCore- to receive messages for Run Command and read parameters in Parameter Store (CloudWatch agent config)sns:Publish- publish SNS message when a new node is ready
EC2InstanceRole:
    Type: AWS::IAM::Role
    Properties:
        RoleName: !Sub ${AWS::StackName}-${EnvironmentType}-instance-role
        AssumeRolePolicyDocument:
            Version: "2012-10-17"
            Statement:
                - Effect: Allow
                  Principal:
                      Service:
                          - ec2.amazonaws.com
                  Action:
                      - sts:AssumeRole
        Path: /
        ManagedPolicyArns:
            - arn:aws:iam::aws:policy/CloudWatchAgentServerPolicy
            - arn:aws:iam::aws:policy/AmazonSSMManagedInstanceCore
        Policies:
            - PolicyName: !Sub ${AWS::StackName}-${EnvironmentType}-ec2-policy
              PolicyDocument:
                  Version: "2012-10-17"
                  Statement:
                      - Effect: Allow
                        Action:
                            - sns:Publish
                        Resource:
                            - !Ref EC2EventsTopic
The Instance Profile allows passing the IAM role to the EC2 instance.
The Security Group permits the EC2 instances to:
receive traffic on Typesense API Port
8108from the Load Balancercommunicate with the other VPC nodes on API Port
8108and Peering Port8107
EC2SecurityGroup:
    Type: AWS::EC2::SecurityGroup
    Properties:
        GroupDescription: allow connections from ALB and SSH, from other instances within VPC
        VpcId: !ImportValue typesense-vpc-VPCID
        SecurityGroupIngress:
            - IpProtocol: tcp
              FromPort: 8108
              ToPort: 8108
              SourceSecurityGroupId: !GetAtt ALBSecurityGroup.GroupId
            - IpProtocol: tcp
              FromPort: 8107
              ToPort: 8107
              CidrIp: !ImportValue typesense-vpc-VPCCidrBlock
            - IpProtocol: tcp
              FromPort: 8108
              ToPort: 8108
              CidrIp: !ImportValue typesense-vpc-VPCCidrBlock
Typesense API Key Generation
The CloudFormation stack will generate a Typesense admin API key using a CustomResource that references a RandomStringGenerator Lambda function.
The TypesenseApiKeyis exported in the Output so it can be referenced in other stacks. Optionally it can be stored in a AWS::SSM::Parameter to be used by other AWS services.
The admin API key provides full control over the Typesense API, make sure you create Scoped API Keys to be used in your application.
TypesenseApiKey:
    Type: AWS::CloudFormation::CustomResource
    Properties:
        Length: 32
        ServiceToken: !GetAtt RandomStringGenerator.Arn
The random string generator Lambda function is deployed using inline code, this works for simple functions when the code length is up to 4096 chars.
Summary
The setup uses 2 AWS CloudFormation stacks that can be deployed into any AWS account:
the Network Stack (1-click deployment) - creates the VPC and subnets in 3 AZs
the Cluster Stack (1-click deployment)- creates all the cluster resources
To get started with the Typesense API once you have the service running, check API Reference
For educational purposes, this post and the included templates feature some common real-life implementations of the AWS Well-Architected Framework concepts such as high availability, elasticity, scalability, resiliency, security, principles of least privilege, etc.
Cover Photo by Samuel Sianipar on Unsplash

